AVI Player on SDL
I am Joan Valiente, student of the Bachelor’s Degree in Video Games by UPC at CITM. This content is generated for the second year’s subject Project 2, under supervision of lecturer Ricard Pillosu.
Download latest release here
1.Introduction
In this website I will explain how to implement a module to reproduce AVI files, and how it works. This modules are programmed in C++ using VisualStudio2017. I am also using Video For Windows libraries and DirectShow to open, read and decompress AVI files; and SDL to render graphics.
I want to say that the way I have implemented this code is not absolute, or the best. There are many ways of doing it, this tutorial is just an example of how I managed to solve this problem, so if you do not want to follow this tutorial and do it your own way I encourage you to check the references links that I visited to do this. I hope you find it useful.
2. Pre-rendered videos on video games
Pre-rendering is the process in which video footage is not rendered in real-time by the hardware that is outputting or playing back the video. Instead, the video is a recording of footage that was previously rendered on different equipment. Since we are learning how to implement a video player to use it on our games projects, I think it is important to explain a little bit what their uses are, their advantatges, their disadvantages, etc.
The most common use of a video player in video games is for cut-scenes. But we can also use it for an intro animation of the studio, intermissions, credits, etc. However, pre-rendered cutscenes are mostly rejected by users nowadays, but we will talk about that later. One of the first games to extensively use pre-rendered graphics along with full motion video was The 7th Guest. Here is a video with the cutscenes of the game.
Since then, pre-rendered cutscenes have been used in a lot of videogames because of its narrative strength. We can see them as an introductory video to the main game, an intermission, a video that is played after a certain event, etc. We can see some examples here.
The Witcher 3 Intro cutscene.
Uncharted 2. Cutscene before a level.
Diablo 2. Act III intermission.
Black Ops. Intermission cutscene.
Valve Intro(2012).
2.1 Pre-rendered cutscenes vs real time cutscenes
Nowadays, most of the community dislikes pre-rendered cutscenes. A few years ago, their narrative strength offset their lack of interaction, but now that our computational limitations are way much smaller, users prefer real time cutscenes.
God of War 4. Real time cutscenes.
3. Our video player
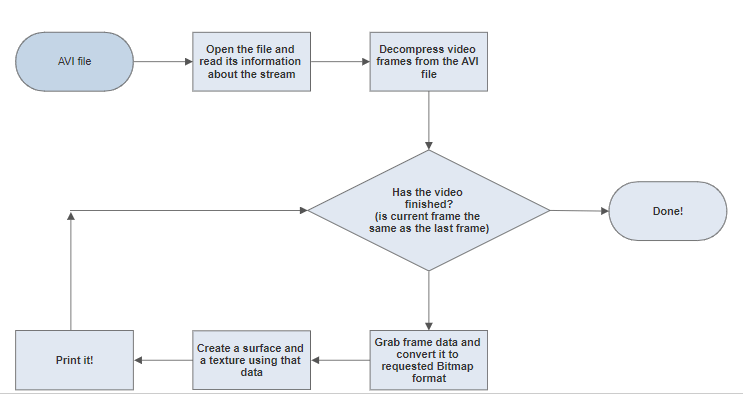
How is it going to work? The theory is really simple. First, we have to read the avi file and the stream data. Then, on each loop we will take the bitmap data of a frame. With that, we will create a surface and a texture from that surface, and we will blit it on screen. Of course there are more steps to follow inbetween those, but that is a brief explanation of how it works.
3.1 The module
FUNCTIONS
We will have four esential functions.
-OpenAVI, that opens the avi file and reads its stream data.
-Initialize, that calls OpenAVI with the path to the file (we will call this function whenever we want to play a video)
-GrabAVIFrame, that gets the frame data, makes a surface and a texture, and blit it.
-CloseAVI, that will free the memory we have used.
void Initialize(char* file_path);
	void OpenAVI(LPCSTR path);
	bool GrabAVIFrame();

	void CloseAVI();
VARIABLES
frame is the current frame we want to display from the animation. We start off at 0 (first frame). The psi structure will hold information about our AVI file later in the code. pavi is a pointer to a buffer that receives the new stream handle once the AVI file has been opened. pgf is a pointer to our GetFrame object. lastframe will hold the number of the last frame in the AVI animation. width and height will hold the dimensions of the AVI stream. pdata is a pointer to the image data returned after we get a frame of animation from the AVI. mpf will be used to calculate how many milliseconds each frame is displayed for. More on this later.
To be able to declare those, we have to include the video for windows library and header files. I also included the direct show header files beacause vfw is a little bit old and outdated, and we will be able to decompress videos with diferent codecs.
int			frame = 0;

AVISTREAMINFO       psi;
PAVISTREAM			pavi;
PGETFRAME			pgf;

long				lastFrame;
int					width;
int					height;
char*				pdata;
int					mpf;
3.2 Codecs
A codec is a device or software that is used to compress or decompress a digital media file, such as a video or song. The “codec” can be dividing into 2 parts: encode and decode. The encoder performs the compression (encoding) function and the decoder performs the decompression (decoding) function.
Difference between video vodec and file format.
A file format is like a type of container. Inside the container is data that has been compressed by using a particular codec. For example, a file format such as Windows Media Audio contains data that is compressed by using the Windows Media Audio codec. However, a file format such as Audio Video Interleaved (AVI) can contain data that is compressed by any of a number of different codecs, including the MPEG-2, DivX, or XviD codecs. AVI files can also contain data that is not compressed by any codec. Consequently, you might be able to play some AVI files and not others, depending on which codecs were used to compress the file and which codecs you have installed on your computer. For the same reason, you also might be able to play the audio portion of an AVI file, but not the video portion. Consequently, sometimes the player supports the video format but still cannot play the video, why? It’s because the video is with an incompatible video codec.
That is why we want to include de Direct Show header, to be able to decompress (and then play) AVI files with diferent codecs. However, including that will NOT make our code able to play every AVI file, but do not worry, I will show you later how to prepare a video in order to play it with the module.
Anyway, if you want to know more about codecs I will put some useful links that helped me in the references links (at the end of the page). One of them is about the codecs that DirectShow supports.
4. TODOs
TODO 1: Call the initialize function.
- We have a function called “Initialize” in the video module. Call it in the start of the scene.
- You have to pass the path to the AVI file.
SOLUTION
App->video->Initialize("video/sample(good).avi");
TODO 2: Open and then release the stream from the AVI file.
TODO 2.1: Open a single stream from the AVI file.
- Use AVIStreamOpenFromFile(…).
- The first parameter is a pointer to a buffer that receives the stream handle.
- The second parameter is the path to the file.
- The third parameter is the type of stream we want to open (in this case streamtypeVIDEO).
- The fourth parameter is which video stream we want (there can be more than one), in this case: 0.
- The rest (RGB masks), are 0 if you do not want to put a mask on it.
- Use LOG to write info in case it fails.
SOLUTION
if (AVIStreamOpenFromFile(&pavi, path, streamtypeVIDEO, 0, OF_READ, NULL) != 0)
		LOG("Failed To Open The AVI Stream");
TODO 2.2: Release the stream.
- Use AVIStreamRelease(…)
SOLUTION
AVIStreamRelease(pavi);
TODO 3: Decompress video frames from the AVI file and deallocate the GetFrame resources.
TODO 3.1: Decompress video frames from the AVI file.
- Use AVIStreamFrameOpen(…).
- Hint: this function returns a PGETFRAME.
- On the second parameter you can pass AVIGETFRAMEF_BESTDISPLAYFMT to select the best display format. Cast it to LPBITMAPINFOHEADER.
SOLUTION
pgf = AVIStreamGetFrameOpen(pavi, (LPBITMAPINFOHEADER)AVIGETFRAMEF_BESTDISPLAYFMT);
	if (pgf == NULL)
		LOG("Failed To Open The AVI Frame");
TODO 3.2: Deallocate the getframe resources.
- AVIStreamGetFrameClose(…).
SOLUTION
AVIStreamGetFrameClose(pgf);
Once you have come this far, you will notice that if you debug the current solution, it breaks when it has to get the data from the AVI stream. Why? Codecs. The video sample that I have left you has not the right codec.
So, it is time to learn how to prepare our video.
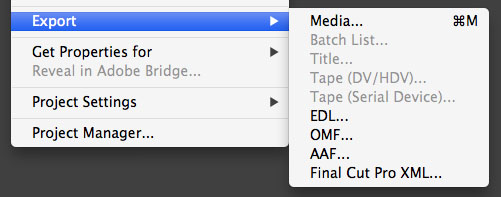
TODO 4: Prepare the video.
You have many ways to do this. There are lots of video converters that allows you to chose an especific codec. Anyway, I’ll explain how I did it. In my case I use Adobe Premiere 2018. I am confortable with it because I am more used to it and it has export options like a video converter, but I insist, you can use other softwares if you feel more confortable with them.
Follow the next steps:
- Go to File->Export->Media…
- Go to Video Codec options and select “Códec Intel IYUV”
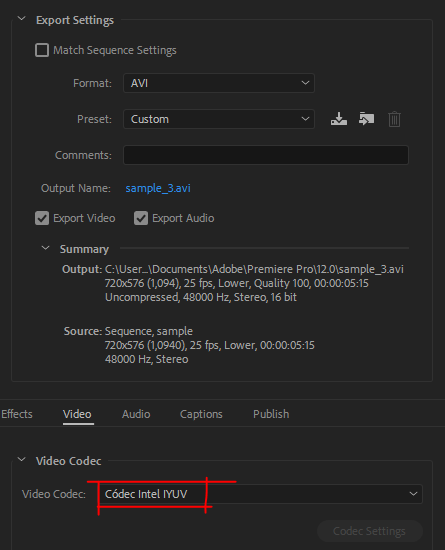
SOLUTION If you have done that steps right, the program should not break now.
TODO 5: Create the surface and the texture, and then free them.
TODO 5.1: Create a surface using the bitmap data we have above this TODO, and create the texture of the frame with that surface (use LoadSurface from textures module)
- pdata holds the texture data (pixels)
- biBitCount holds the depht in bits and is contained in the LPBITMAPINFOHEADER structure
- pitch is the length of a row of pixels in bytes (widht x 3)
SOLUTION
SDL_Surface* surface = SDL_CreateRGBSurfaceFrom(pdata, width, height, lpbi->biBitCount, width * 3, 0, 0, 0, 0);
	SDL_Texture* texture = App->tex->LoadSurface(surface);
TODO 5.2: Unload the texture and free the surface after the blit.
- Use UnLoad(…) from the textures module and SDL_FreeSurface(…).
SOLUTION
App->tex->UnLoad(texture);
	SDL_FreeSurface(surface);
TODO 6: Blit the texture of the frame.
TODO 6.1: Do the blit with the texture we have created in the last TODO.
SOLUTION
App->render->Blit(texture, 0, 0);
Now you should see the video playing, but fliped in vertical and way too fast. Let’s flip it! We will deal with the speed in the next TODO.

TODO 6.2: Prepare the blit function to recieve a SDL_RenderFlip flag.
- Remember to put a default value (SDL_FLIP_NONE).
SOLUTION
bool Blit(SDL_Texture* texture, int x, int y, const SDL_Rect* section = nullptr, SDL_RendererFlip rendererFlip = SDL_FLIP_NONE, float speed = 1.0f, double angle = 0, int pivot_x = 0, int pivot_y = 0) const;
bool j1Render::Blit(SDL_Texture* texture, int x, int y, const SDL_Rect* section, SDL_RendererFlip rendererFlip, float speed, double angle, int pivot_x, int pivot_y) const
{
...
TODO 6.3: Use the flag on SDL_RenderCopyEx(…).
SOLUTION
if(SDL_RenderCopyEx(renderer, texture, section, &rect, angle, p, rendererFlip) != 0)
	{
		LOG("Cannot blit to screen. SDL_RenderCopy error: %s", SDL_GetError());
		ret = false;
	}
TODO 7: Limit the change of the frame to one out of two times.
- Hint: We want to blit a diferent frame only when our counter, i, is an even number.
SOLUTION
if (i % 2 == 0)
	{
		frame++;
	}
	i++;
TODO 8: Play the music of the video.
- Use the audio module.
SOLUTION
App->audio->PlayMusic("video/sample.ogg", 0.0f);
References
- http://www.any-video-converter.com/mac-tutorial/video-codec.php
- https://stackoverflow.com/questions/39059959/vfw-avistreamgetframeopen-returns-null
- https://en.wikipedia.org/wiki/Full_motion_video
- https://en.wikipedia.org/wiki/Pre-rendering
- http://nehe.gamedev.net/tutorial/playing_avi_files_in_opengl/23001/
- http://dranger.com/ffmpeg/tutorial01.html
- https://msdn.microsoft.com/es-es/library/windows/desktop/dd407173(v=vs.85).aspx
- https://wiki.libsdl.org
- https://wolfcrow.com/blog/the-adobe-premiere-pro-export-guide-part-one-codecs/
- https://www.reddit.com/r/truegaming/comments/1zksx4/prerendered_vs_inengine_cutscenes/
- https://www.gamespot.com/forums/playstation-nation-1000002/prerendered-vs-real-time-cutscenes-27069600/
- https://en.wikipedia.org/wiki/The_7th_Guest
- http://lazyfoo.net/tutorials/SDL/15_rotation_and_flipping/index.php
- https://es.wikipedia.org/wiki/Vorbis
- https://discourse.libsdl.org/t/avi-player/11229/3